
Most of us have tried to combine some effects together to make our footage and our final video look cinematic. There was a time where I spent a lot of time finding the right effect or preset so my video could look like the Hollywood movies. I failed and I failed. Sometimes I was closed but in most cases I couldn’t make my videos look cinematic. There are several reasons that I failed and succeeded. In this short article I am going to explain why sometimes we can’t make our video look like a pro cinematic movie and how to come as close as possible to the movies we like.
Cinematic? It’s not always about finding the right effect:
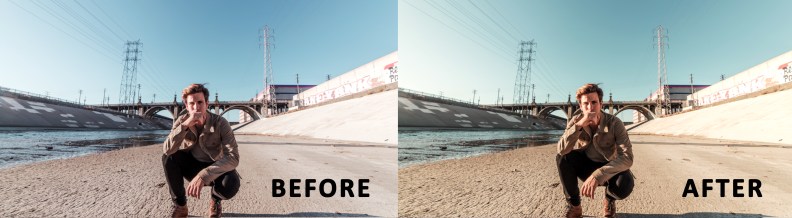
In the professional film making industry, before starting any edits or compositing, you must learn how to shoot and how to do the lighting of your scene. One of the most important things that makes your video looks cinematic is “lighting.” A good and professional lighting to set the best shadow and make the colors look perfect is the first and maybe most important key to get a cinematic view. You can see the difference in the pictures below. The angle, subject and pictures are the same. We’ve only added a bit of shadow to the right one and already we have a better cool cinematic look. Note that this is too much shadow and we only added a bit too much shadow to deliver the concept better.

Next, you need a good and professional camera. Even if you have the best lighting equipment and you’ve set a perfect lighting scene, if you don’t use a professional camera with a high sensor chip you won’t be able to capture all the lights and color of your scene. Your video will look very unprofessional and raw. Even if you try to add extra effects, you will realize that you can’t achieve the perfect result of a cinematic look.
Cameras with high sensor chip and professional lenses will capture the most beautiful view of your scene. Then if you are not satisfied with it, you can fix the minor failure with some extra effects. Of course, a high-quality camera is very expensive for a beginner or a freelance filmmaker, but even with a lower budget you can get a very good camera with high frame rate and good lens.
We’ve also had wonderful experience shooting with the iPhone 7 and higher cameras. In these cases, you need to purchase some apps from the App Store to be able to control all the features of your iPhone camera. Then you can shoot a semi-pro or even a pro shot with your iPhone Xs or any iPhone higher than the iPhone 7 and iPhone 7 Plus.
Cinematic effect with Adobe After Effects or Adobe Premiere Pro:
Now let’s find some tips and tricks that will help us to give a cinematic look to our video, even if the shot is not captured with a perfect camera on a pro lighted scene.
Before we begin, we need to emphasize some important notes:
- Using preset is good and we never deny it, but for a pro video producer it is not the best way to work on a video. If you want your video to be perfect, you must to create your own preset and this can be different for every shot and footage. Presets add a layer to all your video which in most cases will ruin the lights and colors of your video.
- We need to know that adding more contrast is the key but adding too much contrast will destroy the footage.
- The meaning of our scene is very important. If it’s a drama or a sad scene, we can deliver the message with lower saturation and if it’s a funny or love theme scene, we can have more saturation with bright colors.
- The whites and the blacks in the video will help you add the right value of effect and make your video look more cinematic. We need to focus on the whites and blacks. Do not lose the details in the white and black area. Too much contrast will ruin the details.
Let’s start with the very basic Level effect in Adobe After Effect:
The first thing we can do is to fix the whites and the blacks of our footage. In the picture below we’ve used the Level Effect to fix the whitest area to look 100% white and the darkest area 100% black. What is important in adding contrast and fixing the whites and the blacks is to not lose detail. Therefore, I’ve found Level to be the most helpful tool in this regard.
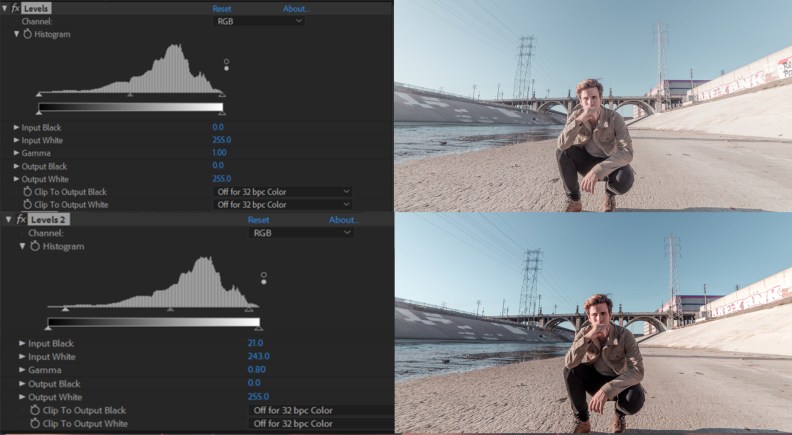
The right handle represents the white areas and the black is in the left. What we can do is to follow the histogram in Level and bring the right handle to the left till we passed the flat area in the horizontal line of our histogram. And then we repeat the same process for the dark side. If we don’t have any flat area, then we should decide if we need to add more black and white or not. Below we see the difference between the raw image and the level fixed image in adobe after effects.

Working with curves:
Eagle Media Labs has an article about the use and the concept of the curves effect. How to do compositing using Curves
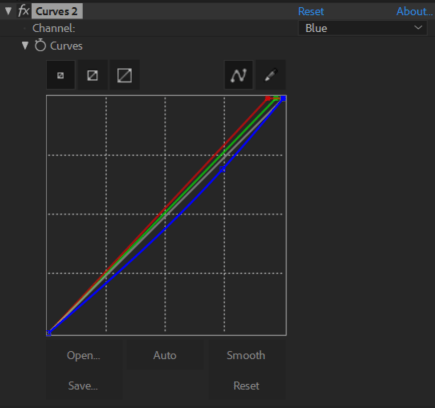
In this case we want to add more contrast with the curves since we have more flexibility with it. Below you can see that we’ve added some contrast adding two dots on the 45° line and again we’ve added a bit more black and white to mix up our colors in the image and controlled the lightings.
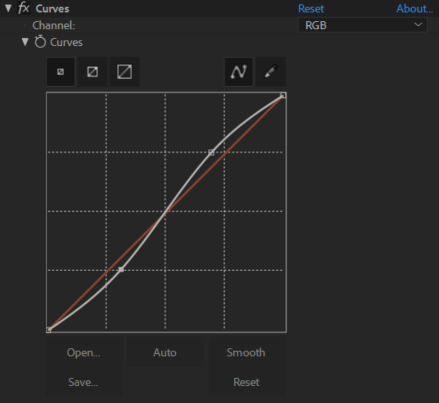
Below is the result and you can compare it with before and after adding curves
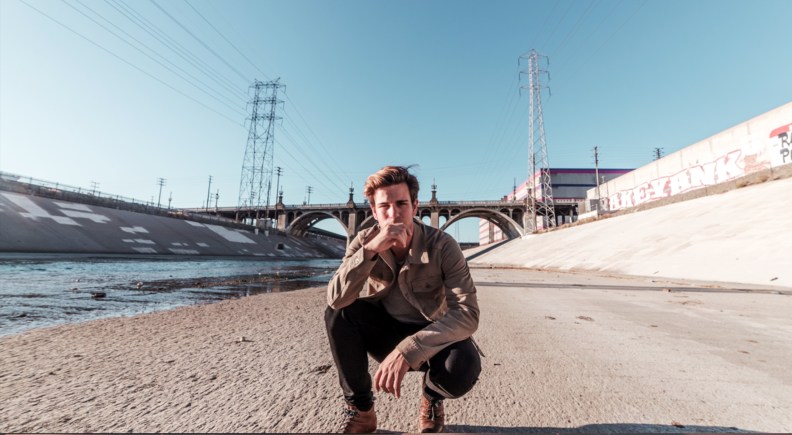
Now you can see that we have a better and brighter sky. The face of the subject looks sharper and the colors look more realistic. Imagine if you have a good camera and lighting equipment so that your footage does not need any compositing like this. That’s why shooting is a very important part.
Now let’s add some colors:
We must choose a color to deliver the concept of our videos. If we have a dramatic scene, better to use coldness, and if we have a happy-victory scene, warm colors will work better. Now let’s go with another curves effect in Adobe After Effects to add some great-warm colors. Below you can see the difference of before and after adding extra colors with curves.

It’s possible that the director does not agree on this color. So it’s up to the director or the video producer to decide which color will better deliver the concept. Viewers won’t realize the effects and the colors by themselves, but they will get the intended feeling if you work well. This is not something we can teach in this lesson and this something that we need to study and experiment with.
And after that we will add two other cool features to make it look more cinematic:
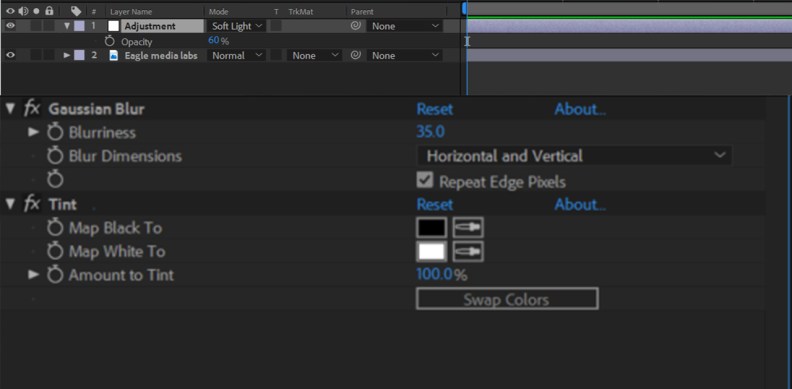
As you can see, we don’t have the perfect cinematic look in our footage because the footage is too sharp and raw with a lot of saturation. So, we can reduce the saturation and mix the colors a bit by adding an adjustment layer above our footage. Gaussian blur and tint are the two effects that we are going to use in this case.
First, we need to add an adjustment layer. Then we’ll add the gaussian blur effect and the tint (both of after effects basic effects and not plugin needed). Usually I add a blurriness of 35-50 in Full HD footage but again it’s up to you to find the best value that fits your video. And then we can add the tint with the amount of 100%, which is the default. This is how it’ll look like so far. It’s a mess, isn’t it?

Here’s the key: We have the adjustment layer above and now we can blend it. You can blend it with the soft-light option but again go through the hard-light and the overlay as well and see if you like the result. This is what we usually do and since it’s a trick, there’s no value and option by default that we can advise. We also need to reduce the opacity of our adjustment layer to not exaggerate the effects. Exaggerating in effects is exactly like adding a pot of ketchup on small plate of french-fries. We want to eat the french-fries—not the ketchup. The ketchup is an addition. In this case we want to see the video and the effect is only an addition.
Now check the result.

And here’s what we did on our effects and layers.
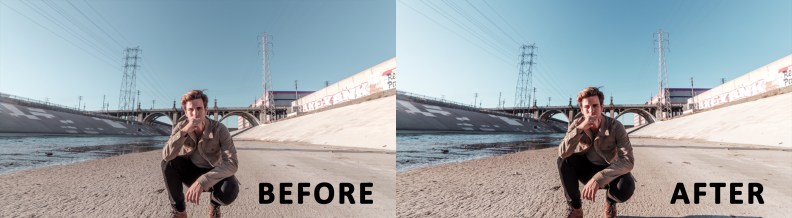
Now let’s go back to the beginning and compare our raw footage with the cinematic look.

Of course, we can add other extra effects and use more tools like the vignette or the blur-vignette to make it look better. But in this lesson, we are focusing on the shadows and light as we said before. Remember, your eyes can be the best judgment at the end of the compositing and no values in the effects can replace your eyes. Also remember that shooting with a good camera and lens and a good lighting is the key to get a better cinematic look. It’s all about lights and shadows.
